
An Instagram content calendar is a planning system that maps what you post, when you post it, and which goal each post serves. Pick a weekly template today, block a 60-minute batch session this week, and schedule two weeks of posts before you close your laptop. That three-step start is all it takes to go from reactive posting to a repeatable system. Statista data confirms Instagram remains one of the top platforms used by marketers worldwide, so the investment in a solid posting schedule pays off fast.
- Pick a weekly template (spreadsheet or calendar-view, covered below) and fill in your content pillars before anything else.
- Block a 60-minute batch session once a week to write captions, select visuals, and queue posts in your scheduling tool.
- Schedule two weeks of posts before you go live so you always have a buffer and never scramble for content on the day.
Key Takeaways
A structured Instagram content calendar, built on a five-column spreadsheet and filled two weeks ahead, is the single highest-leverage change a small team can make to post consistently and grow reach.
| Point | Details |
|---|---|
| Start with a five-column template | Date, Format, Pillar, Topic, and CTA are enough to launch; add columns only as the workflow grows. |
| Batch in two focused sessions | Split caption writing and visual editing into separate 30-minute blocks to maintain quality and speed. |
| Post 3–5 times per week midweek | Buffer and Sprout Social's 2026 data both point to Wednesday and Thursday as the strongest posting days. |
| Measure with the 3-3-1 method | Each month, keep three content types, cut three, and run one new experiment to keep the calendar improving. |
| Crowdcompany for managed execution | Crowdcompany handles calendar ownership, content production, and monthly iteration for local businesses and growing brands. |
Table of Contents
- What does an Instagram content calendar template look like?
- How to build your Instagram content calendar in under 60 minutes
- How should you structure your planning spreadsheet?
- Which tools help you plan, preview, and schedule Instagram content?
- Scheduling by format: what you can automate and what you cannot
- How do you measure performance and update the calendar?
- How to build an idea bank and plan for seasonal content
- What does the data say about posting frequency and timing?
- How to set up your downloadable calendar in 10 minutes
- The mistakes small teams make with content calendars (and how to fix them)
- Crowdcompany runs your Instagram calendar so you can focus on your business
- Sources
What does an Instagram content calendar template look like?
Two formats cover most use cases: a spreadsheet and a visual calendar grid. Neither requires a paid tool to get started.
The spreadsheet template
A spreadsheet works for any team size and is the format HubSpot recommends for getting started quickly. The full version has 12 or more columns, but a solo creator can run a lean five-column shortcut and add columns only when the workflow demands them.
| Field | Purpose |
|---|---|
| Date & Time | Sets the publish slot and feeds your scheduling tool |
| Format | Feed post, Reel, Carousel, or Story so you can balance the mix |
| Content Pillar | Keeps posts aligned to your core themes (education, promotion, community) |
| Topic / Caption Draft | The actual post idea and a working caption so nothing gets lost |
| CTA | The one action you want the viewer to take (link in bio, DM, save) |
The five-column version is the one most solo creators actually maintain. A 20-column enterprise file looks thorough on day one and gets abandoned by week three.
The calendar-view template
A visual month grid shows you the full picture at a glance: how many Reels versus carousels you have scheduled, whether you have a gap mid-week, and how a campaign lands relative to a holiday. Tools like HubSpot's downloadable social media content calendar give you both a spreadsheet tab and a calendar tab in one file.
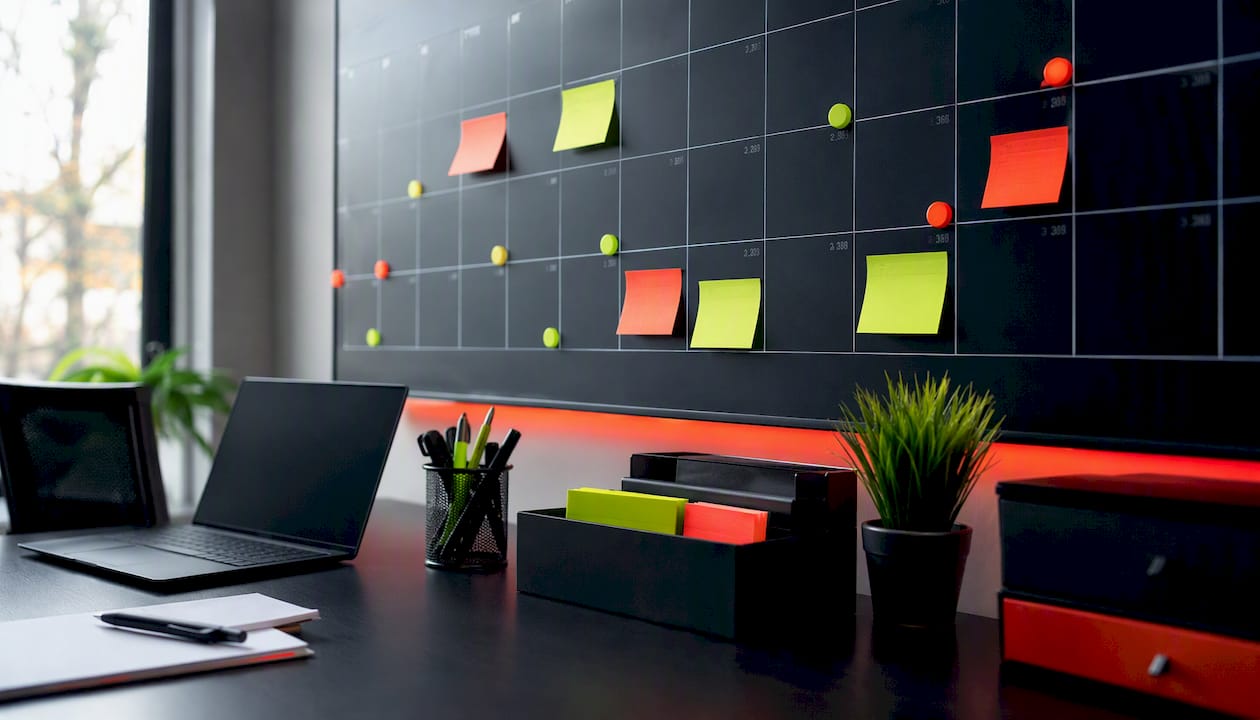
Use the spreadsheet when you are writing captions and managing approvals. Use the calendar view when you are planning a campaign launch or checking your format mix for the month.
For small teams running a restaurant social media calendar or a local business account, the calendar view is especially useful for spotting gaps around holidays and local events before they become last-minute scrambles.
How to build your Instagram content calendar in under 60 minutes
This is a one-time setup. Once the structure exists, weekly maintenance takes 20 minutes or less.
-
Set your goals (5 minutes). Write down one primary goal per month: grow followers, drive link clicks, increase saves, or promote a specific product. Every post you plan should connect to that goal.
-
Audit your last 30 days (10 minutes). Open Instagram Insights and note your top three posts by saves and shares, your worst three by reach, and which formats you have been neglecting. This audit tells you what to do more of and what to drop.
-
Define three to five content pillars (5 minutes). Pillars are recurring content categories that keep your feed coherent. A restaurant might use: Behind the Kitchen, Menu Spotlight, Customer Love, and Local Events. A creator might use: Education, Personal Story, Product, and Community. Every post you plan maps to one pillar.
-
Set your cadence (5 minutes). HubSpot recommends ramping to roughly three posts per week and planning at least two weeks ahead. Buffer and Sprout Social both support a range of 3–5 feed posts per week plus daily or near-daily Stories as a sustainable baseline for most accounts.
-
Map posts to the calendar (20 minutes). Fill two weeks of slots in your template. Assign a format (Reel, carousel, single image, Story) and a pillar to each slot before you write a single caption. This prevents you from defaulting to the same format every day.
-
Connect your scheduling tool and queue (15 minutes). Import the dates into Later, Buffer, or whichever tool you use, and upload the first batch of visuals. Set reminders for any format that requires manual posting (Stories, some Reels).
Sample cadence for a small-business account:
- Monday: Educational carousel (pillar: Education)
- Wednesday: Reel (pillar: Behind the Scenes or Product)
- Friday: Single feed post or UGC share (pillar: Community)
- Daily: Story (poll, question sticker, or quick update)
Pro Tip: Split the batch session into two 30-minute blocks: one for writing captions and one for editing visuals. Switching between writing and creative work in the same session kills momentum for both tasks.
How should you structure your planning spreadsheet?
The columns below cover every field a working calendar needs. Creatorflow reports that creators who batch with a structured calendar cut planning time by roughly 50–60% compared to posting ad hoc.
- Date & Time: publish date and target time slot
- Format: Reel, carousel, single image, Story, or Live
- Content Pillar: which theme category the post belongs to
- Topic: one-line description of the post concept
- Caption Draft: working copy, even if rough
- CTA: the specific action (save, comment, DM, link in bio)
- Hashtag Set: a labeled group (e.g., "Set A: local food," "Set B: lifestyle") so you rotate and avoid repetition
- Visual Status: not started / in progress / ready
- Publish Status: scheduled / posted / skipped
- Assignee: who owns the post (critical for small teams)
- Approval Status: pending / approved / revision needed
- UTM / Link: the tracked URL for any link-in-bio post, so analytics tie back to the calendar row
Sample row in plain English: A Wednesday Reel scheduled for 6:00 PM, filed under the "Behind the Kitchen" pillar, with the topic "30-second prep video for the new pasta dish," a caption draft in the cell, a CTA to "save for the recipe," Hashtag Set B applied, visual marked ready, assigned to the content lead, approved, and a UTM link pointing to the menu page.
Pro Tip: Use data validation in Google Sheets to create status dropdowns for Visual Status, Publish Status, and Approval Status. Color-code rows by pillar using conditional formatting so you can scan the whole month in two seconds and spot format gaps without reading every cell.
Add a Campaign Tag column when you run promotions. It lets you filter the spreadsheet by campaign and pull performance data for just those posts at the end of the month.
Which tools help you plan, preview, and schedule Instagram content?
Every tool below solves a slightly different problem. The right pick depends on whether you need a visual grid, team approvals, auto-posting for Reels, or a free tier that actually works.
Decision checklist: If you are a solo creator focused on grid aesthetics, start with Planoly or Preview. If your priority is team approvals and a shared calendar, Planable is the clearest choice. For auto-posting Reels without a manual step, Later and Hopper HQ both handle it reliably. Buffer is the lowest-friction entry point for anyone who just wants to schedule posts and see basic analytics without learning a new interface.
One workflow worth knowing: tools like ClipForge can turn long-form video into multiple short clips, which fills calendar slots faster than filming each Reel from scratch. That kind of repurposing is what makes a 3–5 post-per-week cadence sustainable for a small team.
Scheduling by format: what you can automate and what you cannot
Not every Instagram format behaves the same way in a scheduling tool. Know the limits before a campaign goes live.
- Feed posts and carousels auto-post reliably through Meta's API on all major tools. These are the safest formats to schedule weeks in advance.
- Reels auto-post on Later, Hopper HQ, Sked Social, and Buffer, but some tools still send a push notification reminder instead. Check your tool's current API status before a campaign launch because Meta updates these permissions regularly.
- Stories are the trickiest. Most third-party tools send a reminder notification rather than posting automatically. Meta Business Suite can auto-post Stories natively, so that is worth using if Stories are a daily part of your plan.
- Lives cannot be scheduled through third-party tools at all. Block the time in your calendar and set a manual reminder.
- Tags and mentions in captions carry over to auto-posted feed posts and Reels, but location tags and product tags sometimes need to be added manually after posting. Build a post-publish checklist that covers these.
- Link-in-bio workarounds: tools like Later's Linkin.bio and Planoly's link page let you point each feed post to a specific URL, which is the closest thing to a clickable link in a post. Add the UTM-tagged URL to your calendar row so the link is ready when the post goes live.
Pro Tip: Before any campaign launch, test your auto-posting setup with a private Instagram account. Post one Reel and one carousel on a test schedule 48 hours before the real campaign starts. Catching a broken connection then costs you nothing; catching it on launch day costs you reach.
How do you measure performance and update the calendar?
A calendar that never gets updated based on results is just a to-do list. Build a monthly review into the workflow.
Track these metrics per post:
- Reach and impressions
- Saves (the strongest signal for feed posts and carousels)
- Shares (strongest signal for Reels)
- Comments
- CTR on link-in-bio posts (via UTM)
- Follower change in the week the post went live
Monthly review template: 3-3-1
At the end of each month, pull your data and answer three questions:
- 3 to keep: Which three post types or topics drove the most saves, shares, or link clicks? Double their frequency next month.
- 3 to stop: Which three formats or topics consistently underperformed? Remove them from the template or replace them with a different pillar.
- 1 experiment: Pick one new format, time slot, or content angle to test for the next four weeks. One variable at a time.
A/B testing posting times within the calendar is straightforward: run the same content type (say, a carousel) at two different time slots across four weeks, alternating each week. Track reach and saves for each slot. After four weeks, you have enough data to make a call. Buffer's analysis and Sprout Social's dataset both point to midweek and evening windows as strong starting points, but your audience's behavior is the only data that actually matters for your account.
How to build an idea bank and plan for seasonal content
Running out of ideas mid-month is a scheduling problem, not a creativity problem. An idea bank fixes it.
10 content prompts that work across niches:
- Educational carousel: "5 things most people get wrong about [your topic]"
- Behind-the-scenes Reel: show the process, not just the result
- UGC testimonial clip: repost a customer video with permission and a caption
- Product or service demo: 30 seconds, one feature, one outcome
- Local event highlight: before, during, or after coverage
- How-to post: a single actionable tip in carousel or Reel format
- Before-and-after: transformation content performs well in almost every niche
- FAQ carousel: answer the question you get asked most often
- Trend response: put your brand's angle on a trending audio or format
- Community spotlight: feature a customer, partner, or local business
Seasonal planning checklist:
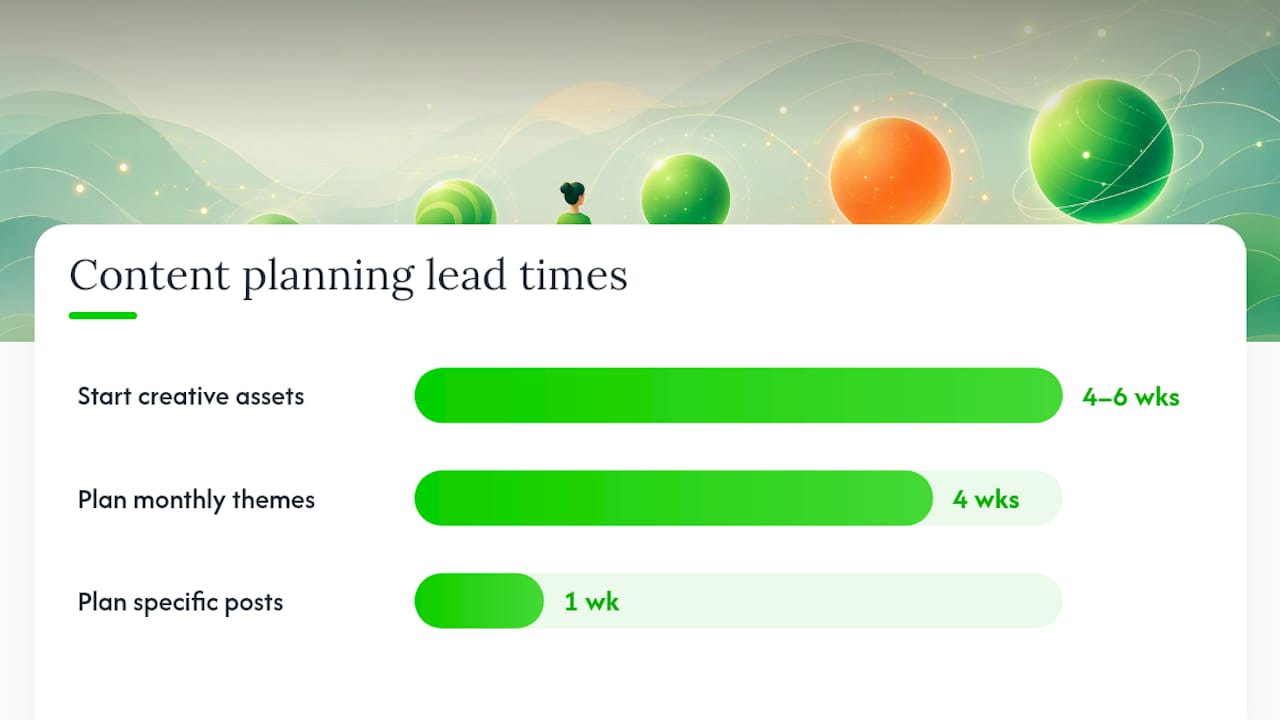
- Start creative assets 4–6 weeks before a major holiday or campaign launch. A restaurant social media plan for Valentine's Day needs photography, copy, and a posting schedule locked by late January.
- Plan monthly themes at least four weeks out; plan specific posts one week out. That split keeps the calendar flexible without leaving you scrambling.
- Reserve 2–3 open slots per week for trend responses and UGC. When a Reel audio goes viral or a customer posts something shareable, you need a slot to drop it into without breaking the rest of the schedule.
For local businesses, tie calendar slots to in-store events and promos. If a promotion runs the third week of the month, the calendar should show a content ramp-up the week before, peak coverage during the event, and a recap post the week after. Pair each of those posts with a UTM-tagged link-in-bio URL so your reporting connects Instagram activity directly to foot traffic and conversions. Crowdcompany's approach to local expansion and theme pages follows exactly this pattern for local business clients.
What does the data say about posting frequency and timing?
The short answer: 3–5 feed posts per week plus daily Stories, posted midweek and in the evening, is the starting point most accounts should test.
Buffer's 2026 analysis of 9.6 million Instagram posts identified Thursday 9 AM, Wednesday 12 PM, and Wednesday 6 PM as the top-performing local-time slots. Sprout Social's 2026 dataset, drawn from nearly 2 billion engagements across 307,000 global profiles, shows Tuesday through Thursday consistently outperforming weekends, with peak windows varying by industry.
Key finding: Both Buffer and Sprout Social's 2026 analyses agree that weekday midweek slots outperform weekends for most accounts, but industry-specific windows vary enough that a 4-week local test is the only way to confirm what works for your audience.
4-week testing timeline:
- Week 1–2: Post at the Buffer top slots (Thursday 9 AM, Wednesday 12 PM, Wednesday 6 PM).
- Week 3–4: Shift one slot to a time your audience is most active based on Instagram Insights.
- After 4 weeks: Compare reach and saves by slot. Lock the top two and rotate the third as your ongoing experiment slot.
How to set up your downloadable calendar in 10 minutes
-
Copy the template. Duplicate HubSpot's free social media content calendar or Creatorflow's spreadsheet into your Google Drive. Rename it with the current month and your account handle.
-
Set your timezone and posting slots. In the Date & Time column, enter your target publish times for the next two weeks. Use the slots from the data table above as your starting point.
-
Fill two weeks of content. Assign a format and pillar to every slot before you write captions. Two weeks of filled slots is your buffer. If something breaks or a trend hijacks a day, you have runway.
-
Connect your scheduling tool or set reminders. Import the dates into Later, Buffer, or Planoly. For formats that require manual posting (Stories, Lives), set a phone reminder 30 minutes before the scheduled time.
For small teams: share the Google Sheet with edit access for content creators and comment-only access for approvers. Add the Approval Status column and make it the last step before a post moves to "scheduled" in your tool. Repurposing long-form content into Reels and carousels using a tool like ClipForge is one of the fastest ways to fill those two weeks without filming everything from scratch.
The mistakes small teams make with content calendars (and how to fix them)
Most small teams do not fail at planning. They fail at maintaining the plan once real life hits.
Mistake 1: Overplanning the calendar before the workflow exists. Building a 20-column spreadsheet with six approval stages before you have posted consistently for a month is backwards. Start with five columns and add complexity only when the team actually needs it. A calendar you maintain beats a perfect system you abandon.
Mistake 2: Treating Stories as optional. Stories are where your audience checks in daily. Accounts that post feed content without Stories lose the habit loop that keeps followers engaged between posts. Block a Story slot every day, even if it is just a quick poll or a reshare of a feed post.
Mistake 3: No approvals workflow for team accounts. Without a clear approval step, posts go live with typos, wrong links, or off-brand visuals. One column in the spreadsheet and a shared comment thread in Planable or Google Sheets is all it takes to prevent this. The fix takes five minutes to set up and saves hours of damage control.
One pattern Crowdcompany sees consistently with new clients: accounts that switch from ad hoc posting to a weekly template with a defined approval step see their posting consistency improve within the first month, which is typically when reach and saves start climbing. The calendar does not create the content. It creates the conditions where good content gets made on time.
Pro Tip: Pair your calendar with a cross-channel paid strategy. Aligning your organic Instagram calendar with paid advertising campaigns means your best-performing organic posts can be boosted the same week they go live, without a separate planning process.
Crowdcompany runs your Instagram calendar so you can focus on your business
Keeping a content calendar current, producing Reels and carousels on schedule, and iterating based on monthly data is a real job. For local businesses and growing brands, it often becomes the job that falls off the list first.
Crowdcompany handles the entire social content workflow: calendar ownership, content production (posts, Reels, carousels, Stories), scheduling, monthly performance reviews, and calendar updates based on what the data shows. No guessing which post to boost or which format to cut. Before hiring any agency for this, ask three questions: How fast do you turn around assets after approval? What does the approval workflow look like for my team? What KPIs do you report on, and how often?
Crowdcompany operates on monthly retainer packages and à la carte flat-fee services, so you are not locked into a long-term contract before you see results. Request a consultation to see which package fits your posting volume and goals.
Sources
- Best Time to Post on Instagram: 2026 Data from 9.6M Posts Updated July 2026
- Best Times to Post on Instagram: 2026 Updated | Sprout Social
- How to Create an Instagram Content Calendar (2026)
- How to Plan Instagram Posts — HubSpot Blog
- Social media platforms used by marketers worldwide (Statista)